Suffolk super punch restoration
Hi all...
Firstly I would like to say a huge thank you to those who answered and offered advice in my recent issues of the top shaft spinning whenever the engine was running, this was hugely appreciated! Despite all my best efforts something is clearly amiss with the machine.
So.. here we are,
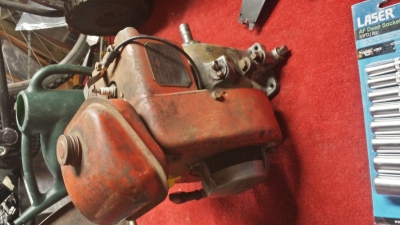
I'm planning to strip, clean, paint and rebuild my suffolk super punch 17" (mid 1960s) for a number of reasons..
Erradicate the top shaft spinning issue
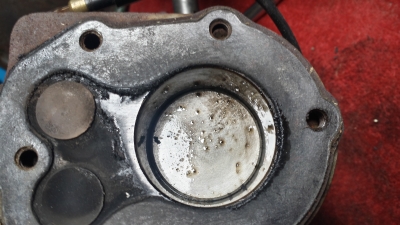
The cylinder spinning (only way to stop this on idle is by increasing the drag on the bottom plate) which has highlighted an uneven cutting surface I think.
I will post pictures of its current state and a video of it running and the shear noise of the blade spinning etc it's to say the least very loud!
I'm currently trying find places online where I can buy all the parts I will need for a complete restoration however I aren't having much luck :(.
Could someone be kind enough to throw some companies or places of where I can obtain parts for the Suffolk super punch 17?.
Many thanks
Rob
Forums

Hi there :)
Hi there :)
I have taken a look at the link you have posted and do offer a small number of parts available which is better than nothing... how do people keep these things running? Haha.
On a lighter note... you may have actually touched on a strong point there in fairness, it's highly likely if previous owners of the mower have had the same issue with the cylinder spinning regardless through misuse or general wear, if someone has been putting a foot on the top shaft to stop it spinning or whatever... that "bulge" on the end of the shaft may have become flattened..
Question is.. is it possible to a) replace brand new? Doubt that
Or b) possible to take the shaft to a local fabricators and ask them to put it in a metal lathe and have it machine back to the near original diameter at its peak of the bulge?... sounds more possible I think and shouldn't cost a great deal..
I am going to strip and completely rebuild it as this way i'm thinking I will learn more.. will give me the best possible opportunity to fully understand the mower and hopefully have a trouble free example for a good while :).
I was wondering earlier.... don't suppose you know, but I have found the cylinder bearings for the 45sk or something similar qualcast.. however... is it likely these cylinder bearings are the same as what's on my super punch?.
I will update with a few pics and a video of its current state etc and will begin the strip! :).
I will be honest and have thought that... if for whatever reason this super punch becomes too difficult to get running right I may go for something else like a 12" or 14" where parts are easier to obtain but still an oldie :)
Thanks
Rob
To restore the shape of the
To restore the shape of the shaft there are two options, build it up with weld and turn it back to shape, or turn the end down a bit and make a sleeve with a "bulge " on it to be pressed ot "loctited" onto the turned down shaft; I'd go for the latter but neither will be cheap unless at mate's rates! Might be easier to hunt around for a scrapper and start again. One went for less than £10 on the bay last week.
Hhmm probably not the easiest
Hhmm probably not the easiest of restorations then haha. If i can find another good shaft i may just buy the shaft.. i was also thinking, can you buy bottom blade? I have been looking on websites for parts but im not sure if the bottom blades ive seen will fit mine or even if my mower has a bolt on bottom blade. Really need to start the restoration to get a good idea of whats going on lol.
Thanks
Rob
The bottom blade / bed knife
The bottom blade / bed knife for a 1960s machine is screwed on. - 7 x 1/4unf pan head screws. The blade is still available as a pattern part from Garfitts - their pt no. G14002. May still be available as an original part F016L04365.
Club members may obtain a discount from Garfitts by contacting Richard Jones at lawnmower.jones@hotmail.co.uk
Thanks for the info and help
Thanks for the info and help there wrist pin. . A new bottom blade is certainly in order as mine appears to have hit a stone or two and is now bent slightly it appears.
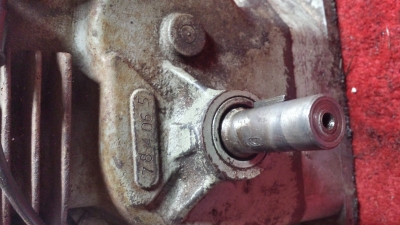
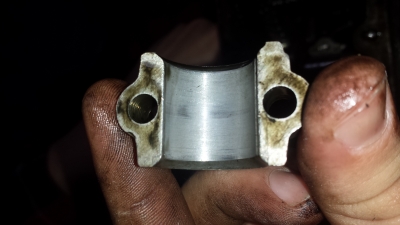
As for the top shaft running issue I happened to have been looking through photos on my phone and came across a picture that showed the end of the shaft that enters the spigot... the bulged end is no longer bulged. I will upload a pic soon for you to examine with your expertise :).
Thanks
Rob
Hmmm a bit out of focus but
Hmmm a bit out of focus but definitely less cone shaped than my example; or should that be double cone?

I'm not sure if it should have double cones or not.. little bit confused on that one. All I do know is.. having seen photos, (I think you may have posted some recently? ).. the bulge was much more apparent than my example in the photos.
Not exactly sure where to go from here really, on option is to have weld put in place and ground down to the correct dimensions again which I doubt will be easy and may not guaranteE a fix as the shaft could be distorted as I an thinking as the shaft has become worn previous owners have used their foot or whatever to stop the shaft spinning causing further wear which could have done further damage?
Not really sure if I could fin a good secondhand shaft sd I'm sumising they would all just be as worn as mine?. Still haven't had the opportunity to begin the strip down yet but can't wait to get started :).
Thanks
Rob
Not had much joy in opening
Not had much joy in opening your photo bucket link - hate the thing anyway!
Double cone - just my attempt at a better description of the bulge. I favour turning down and sleeving the shaft then turning to the required profile. However the are probably dozens of good used shafts out there - just a mater of finding a good one. Personally, in over thirty years in the mower trade, I've never come across the flattened bulge issue so I assume that it's not that common.

No joy with second link here
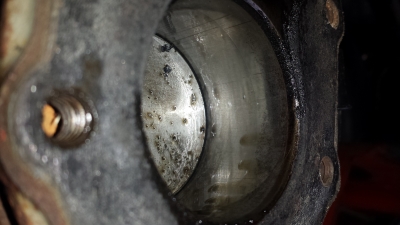
No joy with second link here either but despite the fuzziness of the photo in the first link it looks to me as though there is a distinct narrow band of polished metal with a dirty area on either side of it indicating that there could well be a radius on the bearing surface, give this a good clean up with some fine emery cloth and see what shows up, things may not be as bad as you fear.
Likewise I have not seen a shaft worn at this point and would certainly be looking for a donor machine to provide parts.
Bah humbug. Stupid
Bah humbug. Stupid photobucket. What or how do you upload photos?.
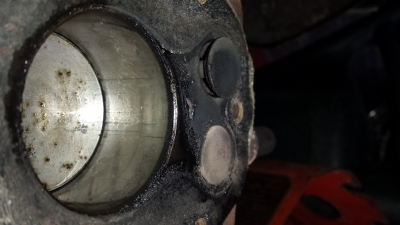
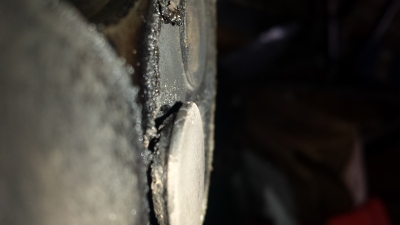
It certainly is "flat" in comparison to your photo that you very kindly posted.
And yes there is a "shiny" fresh surface to the end of the shaft I assume where things have been wearing recently.
I think the best idea way be just to buy another machine and go from there and salvage good parts from both and create one good one "I hope!".
On the plus side... having built my shed a few months ago and doing some bits of building work my somewhat ruined grass has now started to come back through after some grass seed had been thrown down.. will be interesting to see what this mower can really do as it will make short work of my mum's quarter acre of garden :).
I'll begin my search for a second machine :)
Thanks
Rob
hi all...
hi all...
well having watched james may's reassembler on TV last night. it gave me a great insight into the workings of the suffolk mower.
it also gave me the kick up the "back end" to get outside into the shed :)
Heres a few photo's in order (hopefully and hope they may be of use to other owners/users and restorers of the 98cc cast iron suffolk engine.
"engine rebuild is the first process in my restoration"
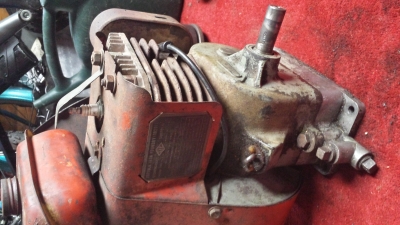
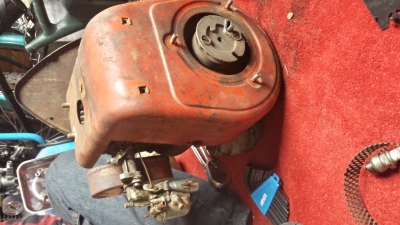
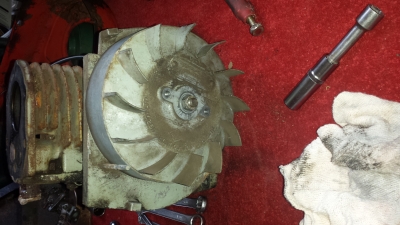

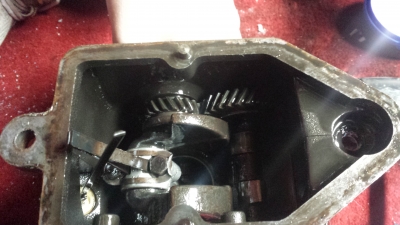
the engine is completely
the engine is completely stripped (except the camshaft and the big gear in the engine block) believe this has to stay inside the block as I can't see a way to remove the gear or the camshaft.
next part of the process is to obtain all the gaskets any other bits I may need (if you feel you have noticed something that needs looking at or replacing please let me know).
all gaskets to be ordered and replaced
engine to be stripped of the gunk and flaky rubbish removed and then painted up (silver gloss).
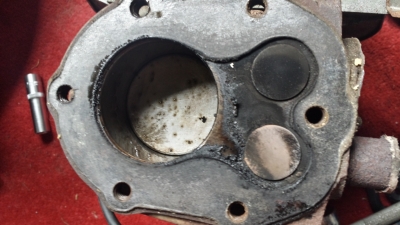
valves to be cleaned and engine de-carbonised.
can anyone offer any info on where I can buy a gasket set for the 98cc cast iron engine?
thanks
rob
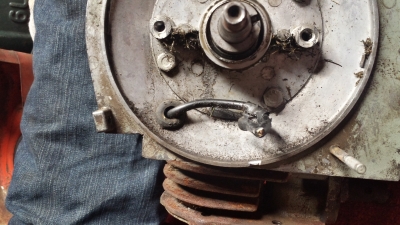
No point / need to take the
No point / need to take the camshaft and cam gear out just for the fun of it but if you look carefully at the outside of the block on the drive side, or with the magneto back plate removed, on the mag side, you should see the end of the dead shaft on which the cam revolves. This shaft may, with care, be driven out from the drive side towards the mag side releasing the camshaft and cam gear. On reassembley note that the camshaft is timed to the crankshaft.
Don't know if anyone is offering a complete gasket set but various individual gaskets are advertised on the bay. Possibly Jon at the Hailsham Mower Centre can put a set together for you.
i aren't fussy about removing
i aren't fussy about removing the camshaft ( i can see the end of the shaft that appears to need a punch to tap it through the block) it can remain in.. I think it will be okay when the engine is cleaned (inside and out to remove the gunk.
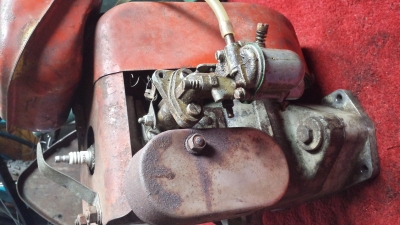
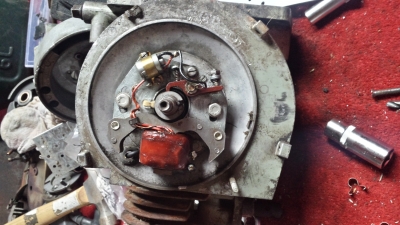
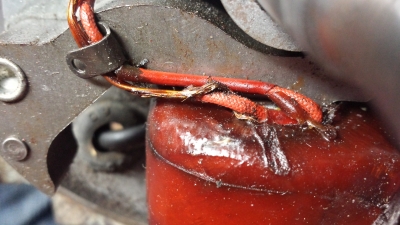
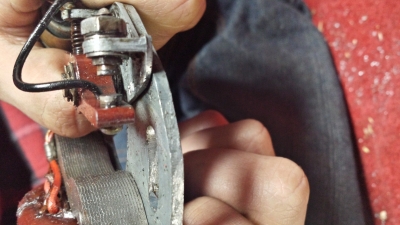
I'll contact the seller you have mentioned and hopefully will be able to rebuild the engine. does that ignition coil look okay? as one of the wires looks a bit odd as if it has melted through the insulating layer?
thanks
rob
"Melted wire" . Looks to be
"Melted wire" . Looks to be the earth/grounded wire which would terminate under a screw , possibly the one anchoring the condenser/capacitor. - so no problem.
Re sourcing gaskets, if all
Re sourcing gaskets - if all else fails you may get the opportunity to learn the ancient art of gasket making.
I'm sure that Hillsider will
I'm sure that Hillsider will preside over the ceremony wearing his official ppe and wielding a golden miniature ball-peen hammer.
Thanks for the replies :)
Thanks for the replies :) much appreciated! I have been back out today doing more cleaning and painting. The wire although appears melted at first glance is still insulated.
I have found I need to remove the solder that secure the ht lead to the coil as the ht lead has broken into two pieces. ( how it was running I don't know).
Thanks for the info hillside, luckily gasket making is a skill I quickly had to learn while owning my old triumph dolomite.. was either wait 3 days for a gasket or make one in 10 minutes.
I have hopefully sourced the correct bits and should be arriving over the next few days.
1) sump gasket
2)head gasket
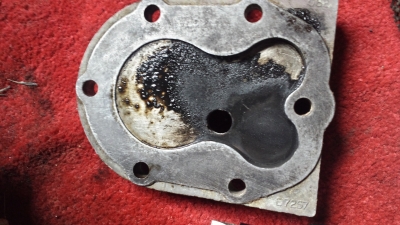
3) valve chest gasket
4) inlet manifold gasket
5) carb to inlet manifold gasket
6) exhaust gasket
7)magneto gasket
Have I missed any gaskets?
8) new spark plug
9)new length of ht wire and new ht cap
10) carb float chamber gasket and carb float
11) new governor spring (original was bent)
12) slow running tube
13) new piston ring set
So far today has comprised of the block, valves, valve springs, valve chest plate and the inner plate, engine back plate, piston, connecting rod, shell cap, air filter housing all being cleaned in a small bath of gunk engine degreaser and the carb body, and exhaust have been cleaned either with gunk and drill for the exhaust with a knot wheel attachment and the engine block, back plate and cylinder head and sump are now painted a very nice deep glossy shade of silver ( engine enamel paint). air filter housing ( metal square type), exhaust muffler and the mesh guard once located inside the pull start have now been painted matt black ( vht paint). The pulls start body is the metal type and has been given the knot wheel treatment and then gone over with different attachments on the drill and just requires minor polishing to give a polished steel effect ( like chrome almost).
Hopefully I have ordered the correct parts :).
Once the engine is rebuilt I will be turning my attentions to the chassis, roller and cylinder side of things and hopefully resolver the "top shaft drag issue on idle).
I'll be sure to post some more pictures in due course ;).
Rob
Not so sure about presiding
Not so sure about presiding over a ceremony! but good to hear that you are already familiar with the art of knocking out a gasket.
Sounds as though you have found a good supply certainly a comprehensive list that you have ordered.
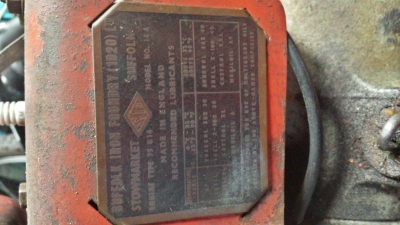
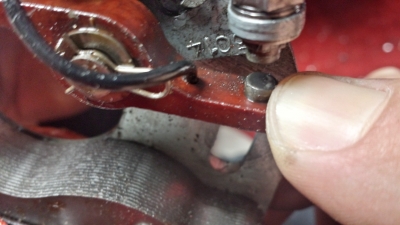
Not only that but I'm sure
Not only that but I'm sure that I can read Type 75 on the id plate on the the engine shroud!
Uh oh... yup all gaskets are
Uh oh... yup all gaskets are 98cc gaskets.. ( sure most will fit but not the headgasket..
I have a 75cc suffolk on my rotator and this engine in the suffolk punch just seems larger overall. It does quite rightly say though " 75 type 14a".
You say it has the earlier ignition and flywheel etc... so where would this engine originally come from and roughly how old?... I'm guessing it's a possibility that the clutch and top shaft issues I have been having could be down to having the wrong engine??.
Rob
Update* had a quick look around the Internet and all I can find is the engine was fitted to the suffolk punch however the series 1 suffolk punch?
I also came across this on the "bay"
http://m.ebay.co.uk/itm/272181452238
17" super punch and on my phone I have zoomed in on the tin wear engine info plate and it says 75g and type is 13a.
So... what does this all mean? I stand to be corrected if I am wrong at all :) could I possibly have an earlier suffolk punch than I thought? Or just an earlier engine?.. question is will it still be okay in the mower chassis it currently uses or not?.
Rob
Could be wrong, but from the
Could be wrong, but from the point of view of crank heights etc the engines are interchangeable and at this stage in their lives the power outputs are fairly irrelevant.
These two indexes from old parts manuals are quite a useful reference work for linking chassis manufacturing dates to Mk and Series model numbers but due to Suffolk's system of listing the engines separately are not so useful for linking an engine model to a chassis.
https://www.dropbox.com/s/37my7g5f29nssb7/Suffolk%20%26%20Qualcast%20Pt…
The crank height on a Suffolk
The crank height on a Suffolk is set by the sump, they came in several depths. The early 17 inch Suffolks used a 75cc engine, this was later changed to the 98cc engine.
Thanks for the link wrist pin
Thanks for the link wrist pin, I have taken a look and it does appear somewhat confusing. The only thing I can work out is... it's possible my super punch is an early model.
Thanks hortimech, I suppose it is possible my super punch is an early model. If so... what sort of year? Early 60s or late 50's?
75g14 type 14a if this helps.. the engine number is etched into the block. Not the type that sits proud.
A load of parcels arrived yesterday from various suppliers but with the wedding on Monday it will have to wait :). Hopefully things will continue later in the week.
Rob
Dating your machine is tricky
Dating your machine is tricky, particularly as looking back through your posts I cant find a picture of the whole machine. However, in the history of Super Punch series there was one major external change - the front roller height adjustment mechanism.
The Series I 1956-59 had individual left and right slotted adjusters - the roller carrier brackets being slotted and sliding in the chassis. The Series II (2) onwards had the Microset single knob screw height adjuster.
To distinguish between the Series II, III and IV would need specific detailed knowledge of changes; some possibly out of sight without dismantling. For example the main external change between the 1967 Series V and '68 Series VI appears to be the adoption of an alloy ribbed rear roller but for the Series VI in 1975 the hidden change was from a proper bevel gear differential to a spring loaded dog assembly as used on the Atco Lightweights of the time - possibly with a change back to plain steel rollers..
Here Is a link to a machine
Here Is a link to a machine exactly like mine
http://m.ebay.co.uk/itm/suffolk-punch-lawnmower-Cylinder-Mower-/272181452238?nav=SEARCH
My super punch has the grooved type rear roller not the later smooth rear roller
It has a small grub Allen crew arrangement for mounting ting the clutch back plate to the end if the crank shaft. ( have seen others with a large bolt?).
The engine in the link above is a 75g14 type 13a
Engine in my super punch is a 75g14 type 14a
Not sure if what I am about to say is what you meant in your last post but here goes...
For the rear roller engagement there is a fork that enters the chain case and connects to a circular spring and appears to pull/push on a shaft if I remember correctly?.
Also mine, just like the above link has a singular wooden handled adjustment know that adjusts the distance of the wooden front roller.
Is it possible that the first few say... hundreds? Of series 1 super punches came with 75cc engines and later to 98cc. And then when the series two was produced the same happened? Began with series 2 75cc engine ( type 14a) and then later went to the 98cc engine?
Thanks
Rob
We can definitely say that
We can definitely say that your machine is not a Series I as it has the single point Microset adjuster for the front roller - a steel knob on the left side of the machine just behind the front roller. That was introduced with the Series II.
The lever, usually with a red spherical knob to the left of the rear roller controls the roller drive dog clutch and is present on all 17" Super Punches.
A bit more knowledge and research is needed to date the machine more accurately.
Edit
Following your comment about the screw securing the clutch back plate to the engine crank, I've had a look through a pile of parts books and the part number seems to have remained unchanged right through the model Series, L3846 and latterly L03846 when all the numbers were given a leading zero ; so whether a machine got a square headed set screw or an internal hex grub screw could have just been down to what they were doing at the time .
Thanks wristpin
Thanks wristpin
We'll have to come back to this subject a little later. I really want to try and get the machine dated as near as possible.
Today has seen the engine and carburettor built back up.. looks great however... on trying to start I found it very difficult to get running with a mixture of fiddling with the choke and the throttle.. and when it did run it was very lumpy... and it vibrated like crazy.
I did fit the valve springs the wrong way round ime soft on exhaust and stiffer spring on inlet valve. I did take the exhaust valve spring from another 75 suffolk and changed them over. So currently the machine has 2 exhaust valve springs in place for both valves.
It's very difficult to start as I say... I did spend some time inserting and removing the crank shaft until the punch mark and line on the crank lined up... ( really hoping it is correct though) as I can't be 100% sure as I was in a bit of a rush.
Could this simply be down to the points needing adjustment?. I did note the stator place wasn't 100% in the same place as it was before I. E bolted in the same place on the backing plate. ( I am hoping it's just points related.... not crank)..
Any ideas?
Thanks
Rob
Doubt if the valve springs
Doubt if the valve springs are the cause of your problem but the valve timing needs to be spot on so check that when the cam gear is meshed to the crank the marks line up. Ignition timing needs to be correct as well - from memory 18 - 20 thou** and then the ignition timing to 22/24 degrees before top dead centre.
** points gap measurement is usually cast into the flywheel.
Thanks wristpin
Thanks wristpin
I have today had a chance to further adjust the stator ignition plate position and it is now running better but still not 100% right.
I also adjusted the carb which has helped somewhat. I did have to also adjust the governor spring and where the end locates at the throttle I had to twist it and loop it round to shorten the springs length to bring that flap a little closer to the rear of the engine which also helped maintain a better idle.
Still needs some minor adjustment to the points and position but it's close enough to get it running.
I am now feeling that this is becoming a waste of time.... the exhaust stub (does not have the bolt type stub) I have tried warming the stub up by running the engine and used vice grips... stilsons and it simply won't budge. The end of the stub is also broken so a muffler can't be fitted. I have a replacement stub and nuts and muffler.
The issues I now have is.. I'm running out of oomph as although I'm sure I could get the engine running right.. I can't get the exhaust stub out,
I'm also in need of two of the caged nuts that are on the chassis that the engine bolts down to.. two broke today. Also... I can't remove the sprocket on the end of the top shaft at all.. I understand is on a thread and so needs to be turned anticlockwise but can't get it off.. I did buy a pair of chain locking grips but this doesn't fit. Now I need a new sprocket as some of the teeth are chewed up.
Also today I have noticed that the chain case (where the end of the top shaft is bolted to) is actually bent slightly. Not much but because of this... would I assume that this is likely to be the cause of the top shaft spinning all the time when on idle etc before the engine rebuild.
The bottoman blade is also dented and will either need replacing or... some minor work with a metal file.. the cutting cylinder is also in need of some minor work... I was thinking of a metal file to clean it up and see if that works.. if not I would just send it to be reground.
I'm not really sure where to go from here in fairness... as the other concern I have is I live in a cul de sac and think the mower is possibly a tad too loud?.. the back garden is 20 metres long and 20 metres wide and the front is the same.. is the 17" overkill?...
I'm wondering when funds allow if the local lawnmower repair shop would be able to help out i.e get the engine running correctly and sort the sprocket and caged nuts and getting running and cutting like it should.. question is I'm not sure how much that could cost?...
Rob
Last question first. Its a
Last question first. Its a bit of a labour of love and at commercial rates of say £30 -40 an hour is probably not on but it can all be sorted
The top sprocket, "drives" so will not be left hand thread as the engine rotation screws the shaft into the sprocket so that it tightens under drive.
Exhaust stub. put a hacksaw blade into a handle or just wrap some tape around it and then make an internal cut or cuts and collapse the sheared stub into itself with a punch. Then make a couple of cuts ito the bottom of your new stub to act as thread cleaners as you screw it in - well lubricated.
If the inner side of the chain case is slightly bent it is likely to cause the bearing behind the sprocket to bind a bit and actually "brake" the shaft. Depends a bit on "slightly"
The design of the old cast iron chassis Super Punches does not lend itself to in-situ grinding which means quite a bit of dismantling - time and expense.
Thanks wristpin
Thanks wristpin
I will give your method a try for removing the exhaust stub I did wonder about effectively "peeling" the stub out in a similar way.
I have further adjusted the stator plate and adjust the governor spring (by twisting the end of the spring on the throttle mechanism) and it does appear to have helped with obtaining a better idle and running at throttle.
Yesterday saw some further progress made and now the engine is nearing completion except the exhaust and minor tuning... I decided to make a start on the chassis and having given the clutch assembly issues I had (hence the reason for this rebuild after many attempts at rectifying the "dragging issues") I do believe the original top/main shaft was out of alignment with
A) the engine needing adjustment on its deck
B)the chain side case being bent had pushed the shaft out of alignment
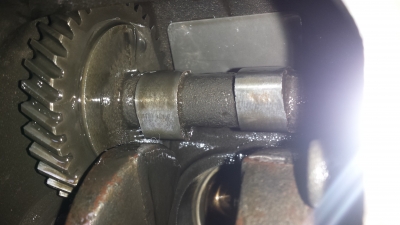
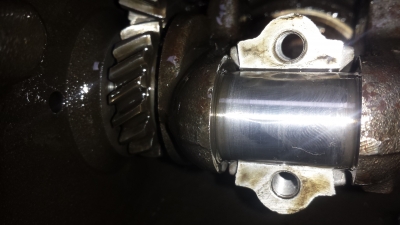
Reason for this is... on the end of the top shaft where it locates into the oilite bush inside the clutch backplate.. this end if the shaft had two "scoring" marks or witness marks that appears to have been catching on something.
I can't figure out where it has likely been catching or dragging inside the oilite bush inside the clutch backplate however I do have another clutch assembly and shaft but from a slightly later "pressed steel" punch. I am hoping this will be able to replace my top shaft and a new 10t sprocket will fit on (have one on order).
The removal of the deck top platform allowed me a further look at the blades and a better view of the bottom blade and if some careful metal filing work was to be done I think a good clean cut will be the case. I know people have warned me about this method and I should have it sharpened properly but for "test" purposes to see if this thing can even cut the grass... I could alays have the cylinder and bottom blade done professionally at a later date when funds allow.
With the top deck removed, I was able to bolt the engine to the deck (the caged part of the nuts have broken). With the help from my younger brother we then decided to remove the "bent" side casing that the top shaft bolts to and removed all chains and such which will be getting cleaned up :). This then allowed us to make small cuts into the remains of the 10t sprocket with a dremel and begin to remove sections of the 10t sprocket. ( my brother is pretty strong to say the least and no matter what that sprocket would not come off the shaft by any other means). This will now allows us to flatten the bend out and hopefully switch the clutch assembly shafts and bearings etc over and with some carefully reassembly and tweaking... should result in a clutch assembly shaft that doesn't "drag" and will mean when the engine is on idle and the hand clutch is NOT engaged the cutting cylinder will remain still.
I will take some pictures when I can.. unfortunately I will be back at work from tomorrow (holidays are over) so the progress may slow down a little.
On another point... I understand this is a labour of love.. breathing life into a machine forgotten and possibly abused by other owners will undoubtedly be a challenge to pull round.. I guess being the less common 17" super punch and being made in the 60s makes it more of a challenge that I wasn't prepared for.. also being my first petrol lawnmower and the machine being somewhat 30+ years older than myself.. what did I expect haha. But for those reasons.. I think it may not be as quick as I had envisaged when I bought it as it does appear to have a long standing issue of the clutch assembly etc probably ignored by others owners too..
So... while the super punch may have to take a little bit of a back seat and be a slower restoration.. I did... accidently on purpose put a small bid on what I "think?" Could be a little bit of an easier restoration and give me an easier insight into these lawnmowers...here.... http://m.ebay.co.uk/itm/162041543014
Are parts easier to obtain than the 17" super punch? Does it look like it could be good purchase?
Thanks
Rob
Uh oh :( the sprocket arrived
Uh oh :( the sprocket arrived this morning and it isn't the correct one.
Can anyone help? I need a 10t sprocket that screws onto the end of the main/top shaft.
Thanks
Rob
Biffa, my exhaust was a stub
Biffa, my exhaust was a stub right up against the block!
block the exhaust hole as best i could then dremelled a slot into the stub (of what remained of the exhaust) an was able to tap the remains around with a hammer an screw driver.
really really bodge-tastic but got it off in the end an was able to fit one of these
http://s25.photobucket.com/user/mudcow007/media/20160412_194954_zpsykcw…
Im in the same sort of situation with funnily enough 17" super punch too, except my garden is tiny an i'm only playing around with my punch as i just fancied having one.
Im struggling to get mine to run properly plus the clutch seems to be dragging too - so the blades are constantly spinning.
Hi mud cow
Hi mud cow
That's what I think i'll do with the dremel in fairness and then see if I can use a punch to push the threads apart and remove the dud stub. Can I ask.... where did you get that new "stub"? I'm hoping it will be possible to modify the muffler arrangement in someway to allow me to pack a muffler (original or not) with motorcycle exhaust wadding to hopefully quieten the noise down a little so not to annoy my neighbours.
You say your clutch is dragging? Is it just the clutch shoes catching as these can be adjusted as you " should" have two slotted adjustment screws for each shoe and this applies tension and resists the shoes from coming in at idle speed.
If you mean the top shaft is continually spinning when the engine is idling even without clutch shoes fitted this is the problem I am having. I have tried to move the engine around on its mountings ever so carefully.. I have changed the oilite bushes in the clutch backplate and clutch drum with no improvement.
At present now I am in process of removing the top shaft completely and binning it as the end of the shaft that enters the clutch backplate appears to have become worn and has scoring to it. Hopefully after some careful juggling and joggling things will line so not to cause a drag and will not engage the cylinder unless the hand clutch is engaged. Where are you from?
Rob
Hi Rob
Hi Rob
Exhaust is a "Briggs & Stratton" from ebay, - like this
http://www.ebay.co.uk/itm/NEW-Briggs-and-Stratton-Genuine-89966-Exhaust…
it cost about £7 directly screwed into the block, I had to use a 1/2" elbow plumbing fitting as the exhaust would fowl on the carb - think the fitting was £1 from a plumbing merchant
There is a video of a bloke on youtube who makes an makes an exhaust from a length of hose an a tin - I kid you not....in the video it does seem really really quiet, I just don't know how realistically it would work though
https://www.youtube.com/watch?v=6jK4ZogVbnw
Cheers for the tips on the clutch, if im honest i haven't even looked at it yet, but been trying to concentrate on getting it to idle normally, at the moment it roars into life an is running at around 2k revs. if i turn the choke off it dies. It must be the carb..
Im in Liverpool, you?
90, 45 and 30 degree fittings
90, 45 and 30 degree fittings.very good prices and mail order service
http://www.jtmplumbing.co.uk/pipe-fittings-c433/malleable-fittings-1-8-…
Thanks mudcow
Thanks mudcow
I do have a good second hand exhaust stub and exhaust that I would like to use but I think the neighbours would think better of me if I could quieten down the noise a little somehow.
Is it possible to separate the brig and straton muffler if so I could pack the outer edging with exhaust wadding to absorb the noise a little.
I am in Castleford west Yorkshire
If your clutch does have the same issue as mine hopefully we can work things out and clear the issue as it has plagued me for a few months now.
As for the running issue of a fast idle, have you tried to adjust the governor spring? If the governor spring has had one of the ends twisted to effectively create tension and bring the air flap further towards the carb that could be a possible issue of high rpm.
Thanks wristpin this could be of good use!
Rob
I think that you are going to
I think that you are going to struggle to find new parts but it may be worth trying.
http://www.themowercentrehailsham.com/
http://www.jungle-busters.co.uk/Lawn-Mower-Spares
Strangely , I was thinking about you at the weekend while I was dismantling a Mk1 14" Punch which is basically a scaled down version of your 17" Punch. Something that we didn't touch on was the shape of the end of the clutch shaft where it enters the spigot bearing so that only a narrow band is in contact with the bush. Not sure of the the correct geometric description but if the bulge has worn flat and the end of the shaft is parallel a greater area will be in contact with proportionally more friction.
The attached sketch may explain my thinking!
https://www.dropbox.com/s/7rxqep81uiw2441/Suffolk%20shaft0001.pdf?dl=0
EDIT
This may do a better job!