Spray painting undercoat required?
In the restoration section it says to prime and then undercoat. I've just been to halfords and they dont have any undercoat branded or un branded.
I have etching primer, red oxide primer and hi build primer and none of them suggest an undercoat after applying.
Forums
OK, the 'red oxide' you can
OK, the 'red oxide' you can buy nowadays, isn't actually red oxide, so you could refer to this as a 'primer' and the primer (etching or hi build) is an undercoat. You do not actually need both, but it will not hurt. As for etching primer, this is only really needed to key to something that paint doesn't readily stick to, such as aluminium or fibreglass etc.
Thanks for clearing that up.
Thanks for clearing that up. Any idea on what's caused this and how to rectify? I'm hoping it will just sand back, but the cylinder literally rusts before your very eyes!
As there is no heat in the workshop I did lay down coats and used a heat gun. Simoniz red oxide 2 coats primer and simoniz hi build primer 1 coat as I wanted to sand before the final coat. (In hindsight i should have just sent it away to be done) probably a lot cheaper, but i wanted to have a go.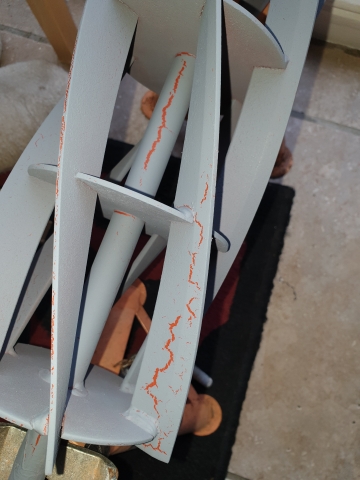

When I do my own painting I
When I do my own painting I use a two pack non isocyanate primer from Jawel paints. Dries chemically quickly and is as non-porous as you can get. It thins down and can be applied with throwaway rollers to large areas on grass boxes etc or by brush to fiddly bits such as cutting cylinders. If you don't want the minor faff of mixing paint, hardener and thinner they do a two pack one can aerosol but once you've pulled the ring to mix paint and hardener it has to be used and any left over goes hard in the can.
https://www.jawel.co.uk/index.php?main_page=product_info&products_id=4108
It looks like the primer is
It looks like the primer is reacting with the 'red oxide', you will probably have to remove everything and start again, but this time using compatible paints.
Hortimech that was my initial
Hortimech that was my initial thought which is why I mentioned both paints are the same brand. The rest has bonded really well so will wet sand back down without going to bare metal to see how the bonding really is.
All,
All,
I have had the same results as Warpa experienced. I found the cause....the grey primer was applied too thick to the red oxide underneath. As a result, it dried unevenly..being slower to dry where the primer had "puddled". It also occurs if you are in a rush to apply the grey primer before the red oxide has fully dried..I found leave it to dry thoroughly for 24 hours, lightly sand and apply a further thin coat of grey primer. No harm has actually been done and and you will not even notice it. At least the surface of the metal has been covered to prevent rust formation.
I fully recognise each has their own preference and technique, but I use one coat of red oxide, 1 coat of grey primer, 1 coat of top paint applied thinly (I use up spare paint which is close in colour to the final top coat) and don't worry if the coat is patchy, but apply it thinly. Leave to dry for 24 hours-48 hours between coats. Then apply the final coat. Following research with an aerosol company I found that paint can be supplied in 1K or 2K packs, the 2K pack has a in-built hardener to the paint which means your final top coat will be quite hard. Not all manufacturers state if the hardener has been added or not. If you use a 1K top coat paint, the paint will be soft, even when thoroughly dried, and will scratch quite easily. To get around this I apply a thin coat of clear lacquer spray (same as car body shops) which creates a hard shell to the final coat of paint. Leave 24 hours after applying the lacquer and then I apply a car polish.
Hope this helps.
Tony
I would question applying
I would question applying both primer and red oxide, I would ditch the “red oxide” as even if it was the genuine article ( which it isn’t these days) it should be next to the metal.
Another thing to consider is that 1k paint manufacturers usually specify that the primer or undercoats should not be bone dry before the next coat is applied so that the solvent from that coat eats into and bonds the top coat to the base layer.. The stuff that I use on cutting cylinders specifies not more than 20 minutes between coats, but mine are workers, not posers!
I'm all up for ditching...one
I'm all up for ditching...one less process and less cost. I think mine have OCD! Also some were such rusty wrecks that they needed the make-up. I've just got too many to be all workers. The shed is creaking at the moment....so look out for some JP restorations articles soon.
Interestingly, on the inside of the transmission covers and bearing covers, I have noticed that there was no undercoat or primer applied anyway, it being a benign environment for rust. Just a top coat and possibly only one coat at that. The paint is definitely more responsive to paint stripper which reacts quicker than on the outside coats. Of course it could be argued that the primer can act as a filler for some of the rust pitting to give a more even top coat.
regards,
Tony
Thanks for all the feedback
Thanks for all the feedback it's been most enlightening. I was far to hasty putting on the layers. After a bit more research it seems I can spray in the cold still, just need to keep the paint warm and apply thinner layers which will also probably give better results.
We are a bit restricted in winter and working full time, means evenings and weekends are the only time I have to try and pick the warmer days. Seems cold and dry would be better than warm and wet. Once I've put the layers on I am able to bring them into a heated conservatory.
Warm and wet is bad news,
Warm and wet is bad news, tends to make the paint bloom; the lower the humidity the better . Warm the paint and, if possible warm the parts that you are painting.
While there is obviously a "convenience cost" to using aerosols they are useful, particularly the etch primers . Have a look at Upol Power Can and Acid Etch, also ProXL Etch. Not just for awkward substrates like alloy, galvanised and stainless but equally tenacious on basic iron and steel. However when it comes to filling pitting etc you cant beat two pack non-iso primer as the chemical hardening allows it to be applied far thicker than you would get away with for normal air-drying paints. Also, in cold weather, upping the ratio of hardener reduces drying and handling issues.
Warpa, don't worry, we've all
Warpa, don't worry, we've all done it and learnt the lesson. Its all part of the learning curve. There are many members on this forum who have been through the learning curve, some having done it as a profession, so the advise is always worth noting.
It would be interesting to do a poll or survey of how much members like cleaning and respraying cylinder blades. Personally, I find them awkward little s..ds and one of the least attractive (albeit necessary) tasks. Judging by some of the paint efforts I have seen from repair engineers who have sharpened blades, I think it is often rushed. This I find annoying...why spend time sharpening the blades to leave them dripping with paint runs. It seems to run counter-intuitive to presenting a professional outlook. But then, I readily admit I have not had to do this as a business and perhaps the mindset is different.
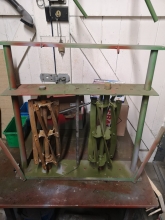
I made a jig to paint my tie-bars and cylinder blades so I got an even coat....and its rotateable....For best results, paint in a warm dry room, you get a better shine on the paint and beware of fumes. Moisture levels need to be low. If I remember reading on the forum somewhere, we even have to counter venting of tumble dryers into the garage courtesy of our dear ladies.
regards,
Tony
This I find annoying...why
This I find annoying...why spend time sharpening the blades to leave them dripping with paint runs. It seems to run counter-intuitive to presenting a professional outlook. But then, I readily admit I have not had to do this as a business and perhaps the mindset is different.
If I remember reading on the forum somewhere, we even have to counter venting of tumble dryers into the garage courtesy of our dear ladies.
...... and no warming the workshop with paraffin or bottle gas heaters!!
A mower repairer not that far from us used to have a large vat of red paint and dip cylinders into it and hang them above it to drip dry - not good! We had a hot caustic soda tank to remove paint but even that used to struggle with the bits of powder coat that had actually bonded with the metal . After the hot tank an acid tank to remove rust, quickly followed by a pressure wash and dry with a blow torch and spay paint while still hot and before the flash rust appeared. Quite a lot of work and expense reflected in the cost per inch price for grinding.
Now I only paint customer's cylinder to order. This one came ready painted. Supposed to be here but the iPad insists on putting it at the top!
I like it Angus. I think I
I like it Angus. I think I will give it a go on heating the blades with a blow torch before primer. Not really given that one much thought.
Thanks,
Tony
Interesting reads, I did use
Interesting reads, I did use my hot air gun to heat the cylinder before paint, not too hot to touch as I didnt know if it was the right thing to do. The aluminium housings etc I have decided I'm going to polish, probably not to a mirror finish but will see how I feel.
I assume the mower came supplied as just pressed alloy and no paint, possibly due to the fact Ransomes knew it would be a weak point being scraped along garden walls etc? One main thing that will slow the polishing down is not being able to clamp it in the vice without damage.
In writing the above i just had a eureka moment, i can use a G clamp or one of my quick plastic clamps and have half over hanging the worktop.
I'm hoping this restoration will be above the average DIY job in its finish. Not sure what a pro restoration covers but so far mine has been a full nut and bolt job. The only job i wont be doing is sharpening the cylinder and bottom blade. I have a chap who has done that for me and sets the blade ready for use. At a cost of around £70 i may leave that as an option to the new owner if i decide to sell it
As always I'm always open to correction and advice as I'm an old school carpenter by trade, not an engineer. My uncle is the engineer who provides me with free polishing pieces and machine parts free.
Quick question and I'll
Quick question and I'll probably answer it myself in this post. Parts were all primed up today and ready for paint. Should I flatten the primer for a better finish bearing in mind I'm going to lacquer with 2k. I'm thinking;
Flatten with wet and dry, 2 coats of colour, flatten and 2 coats of clear, flatten and machine buff. If I can save a stage or 2 it would save time, but I am after a superior finish.
The problem you have Warpa is
The problem you have Warpa is that your question ultimately comes down to personal choice. Using Wristpins priceless observation - is your machine going to be a worker or a "poser". You could take the ultimate perfectionist approach and do what Rolls Royce did - apply 11 (or 17 - I cannot remember) coats, each rubbed down and finally polished with air-blown oat husks! But the more you polish it etc, the less likely you may be inclined to use the mower for fear of scratching it.
The majority of us (and I write generally) probably apply a maximum of 3-4 coats including red oxide, undercoat primer and 2 coats of top coat plus if the mower is in luck a wax afterwards. I would avoid spraying until moisture levels have reduced. I am leaving mine until the spring as I do not have a ventilated centrally heated garage..for reasons previously mentioned.
If you intend to put on that number of coats - make sure you have plugged all screw holes! Because I replace all fasteners with new, I use the old screws to plug the threads.
Tony
This mower will be sold to
This mower will be sold to buy a certes and is a practice run at restoring an old mower, the only thing I'll be leaving to the buyer is getting the cylinder and bottom blade sharpened.
I don't have ideal painting conditions but have used warm spray and pre heated the parts, then used heat to dry and bring into the conservatory.
Ok, so to continue the
Ok, so to continue the research I have done by myself I may as well reply to myself. There is no need for undercoat but there is some confusion between using red oxide or etch primer on bare metal.
A guy doing jaguar restorations says 2 coats of oxide and 2 coats of etch, now I would have said the other way around as the etch has acid to eat into bare metal.