Old blue deck flymo
Hi
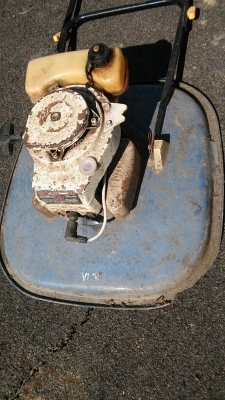
Where can I find more info on this Flymo, manual etc?It is marked Professional4. Also will I be able to source a new primer bulb or will it be a bodge with an alternative? Thanks
Forums

Thank you for the reply,
Thank you for the reply, information and document. The last time I dealt with 'points' must have been the early 80s on my Mk1 Escort! This mower could be a challenge. I don't even know the fuel ratio, 16:1? Is there a std user manual also available?
16:1 was the recommendation
16:1 was the recommendation at the time and the oil recommendation then was Flymoil which was basically a non-detergent SAE30 motor oil. I would suggest that you stick with a non-detergent 30-grade oil rather than a modern semi or fully synthetic mixing oil. Both Millers and Morris Lubricants market a Classic Bike 2-stroke oil.
I have a full workshop manual for the engine and can scan any sections that are of interest. Your first issue will be the primer bulb but if originality is not a priority you can fit the later bowl carburettor which was used on the later engines. This is mentioned in the notes section of the scans that I've already posted.
It is almost inevitable that the points will need to be cleaned and adjusted and that involves removing the flywheel. This will involve either a puller that pulls on the centre (not the rim) or a "knock-off" tool that screws onto the threaded end of the crank and protects it while the flywheel is jarred off.
Thanks, oil type noted. I
Thanks, oil type noted. I read the notes about the replacement carb but for now I will try to get it running with the original carb and botched primer.
I am happy enough cleaning points and have so far managed to get flywheels off without a puller using a few sharp taps in appropriate locations.
Can't see an obvious way this engine was stopped?
Time to start doing it
Time to start doing it properly! “Sharp taps” risky!
Stopping . Standing behind , above and to the right of the air cleaner on the bracket that supports the carb, there should be a lever that moves horizontally and shorts out a lead from the points / coil primary.
Point taken, one day I'll
Point taken, one day I'll regret it.
From your parts diag I sussed it was that lever. The multimeter says it isn't shorting to earth, probably needs cleaning and realigning.
Thanks again for your help, I'll let you know how I get on with the carb.
If you can’t rig a primer
If you can’t rig a primer bulb there is technical solution ( bodge) !
with a working primer you can do a couple of checks on the carb. Put some fuel in the tank, pull out thr air filter sponge and the perforated metal screen and hold the throttle butterfly wide open. Then press the primer sharply a few times while looking through the carb venturi. If all is well you should see a healthy jet of fuel emerge from the floor of the venturi . No fuel there? Remove the brass headed jet from the carb and repeat the priming pumps . If fuel comes out there , replace the brass jet and remove the adjustable one next to it and repeat priming . Fuel there and it gets a bit more serious as the next stage is to remove a Welch plug above the diaphragm. Above the plug is a no return valve consisting of a brass insert with a tiny nylon ball above it. In the day, with n/r kits readily available we didn’t attempt to clean the existing valve but screwed a small pk screw into the insert and pulled it out . A new insert was then fitted without the nylon ball ( as per a service bulletin) followed by a new Welch plug . Just to make life interesting there were two fractionally different diameter inserts and Welch plugs.
Neither of the kit is still available new and you are unlikely to find any new old stock on the bay or similar but Welch plugs may be found in “ boxes of assorted” favoured by chainsaw repairers. If you get to the stage of identifying a blockage in the n/r valve, I suggest blasting it with aerosol carb cleaner via a thin nozzle extension pipe and hopefully achieving a jet of cleaner up into the venturi . It then just remains to refit a Welch plug etc.
Thanks for the detailed
Thanks for the detailed instructions. Copied, pasted and printed for when my temporary primer arrives. It'll prob be mid week before I get back to it.
Yes, it is a Professional,
Yes, it is a Professional, and is fitted with an Aspera VA633 Flymo Special Execution engine with a diaphragm carburettor. About the only parts that are easy to obtain are the contact breaker points . Pattern part Diaphragms are obtainable as are carb needle valves.
Early carbs had a replaceable “ poppet” non return valve that are like the proverbial hen’s teeth or even rarer. Later ones have a ball valve. Without a working non return valve they won’t prime - or start! Primer bulbs do appear on auction sites from time to time.
When they were current machines in the 60s and 70s I overhauled so many that I think I could still do so in my sleep.
EDIT These may help
https://www.dropbox.com/s/tjvdejfohjd8xos/Aspera%20VA6330001.pdf?dl=0